Posts

Task Manager

Image
For my final project, I decided to use the Arduino as a controller for a computer game made using Processing. The game requires the player to constantly be managing both of the lines that change direction based on the 2 switches and both of the balls that bounce based on the 2 push buttons. If any of the lines or balls reach either the top or bottom of the game screen, the game is over. In terms of wiring, I tried my best to keep it extra clean and decided to hide them by simply covering them with paper. Thankfully, the breadboard is small enough that it can be held without feeling clunky or unlike a really game controller. Source Code:  https://github.com/alexpasieka/task-manager
Lentils and Jello Maze Game

Image
The idea is a physical maze game where enough lentils need to reach the end to weigh down the pressure sensor and win. But, along the way, there are Jello obstacles that would stop the lentils that the player must adjust the maze for. The player can physically move the maze pieces until they find a path that perfectly sends the lentils to the end uninhibited by the Jello. This idea comes from mazes often found in kids museums where this is the same idea, except usually with balls and other obstacles rather than lentils and Jello.

Switch On/Off Music

Image
Originally, I was attempting to create a device where you could clap on and off the music (each with 2 claps), but due to confusing code and bad wiring, that failed and I had to use this as a backup. The end result is simply a device that play's Pachelbel's Cannon when the switch is turned on and stops playing when the switch is turned off. I definitely over-scoped my first idea and under-scoped this idea, but at the very least, it works.

Exercise Music Shirt

Image
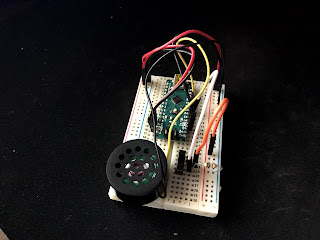
For my second project, I made a wearable in the form of a shirt that plays music whenever the user moves/exercises. The shirt features a FLORA accelerometer sensor that has been sewn to the chest area. The sensor is then connected to the duct taped breadboard which holds an Arduino Nano. The Nano also has a speaker connected to it. Finally, to supply power, I used a 9 volt battery with a connector for ground and power. I was going to add some sort of pouch, or at least a switch to turn on and off the device, preventing the need the plug and unplug the battery for every use, but that was more of a stretch goal. Also, as mentioned before, I attempted to sew, but mostly failed and used lots of tape. Although that was also because I could not see a way to sew the whole breadboard securely. The only successfully sewn portion is the sensor, mostly because it is meant to be sewn through its holes. In terms of the software, I used the toneAC library for better sound control than the native...

Exercise Music Taxonomy

My idea for a wearable project is to create a shirt which detects motion from the body to play music. The music will only continue to play if the body continues to move. The idea is to have the mechanism detect if things like walking, running, or jumping are occurring. Motivations: Motivation is probably the key component to the whole project since the shirt itself serves to motivate someone to exercise by rewarding with music. Hopefully, music is enough of a motivation for the user to approach and continue the activity. Expectations: I think that most people approaching this wearable would feel encouraged to exercise, but would not feel like this would truly heighten their workout. However, imagine listening to a song and having it stop mid-way, or even during a chorus. I think the music itself will inspire the user to continue moving at least until a good ending point in the song. Associations: Some people might attempt to match the beat of the song to their activity. It would ...

LED on Fabric

Image
As this was the first time I was tasked with using loose wires and an LED detached from the breadboard, I was worried going into this. However, it turned out fine. I definitely need to solder the connections for the future, but as a rough test, this was successful. I thought the connection was going to be a lot more finicky, but thankfully my wiring job was strong enough for the LED to work. This has made my expectations for the wearable project a lot less stressful.

Simon Clone

Image
This is my first project working with an Arduino, specifically the Nano. I made a Simon clone in which the player must repeat a randomized pattern that gets longer each round. I decided to stick with digital inputs, using 2 push buttons and 2 colored LEDs. If the player messes up any part of the pattern, the game will immediately reset, letting the player know they lost by flashing both lights 3 times. The player can also take as long as they need to respond. The max game length is 100 inputs, but obviously unless you have an amazing memory, that number will never be reached, essentially making this game "endless".